Tuesday, November 23, 2010

Birthday Blessings

My little sister turned 40 this year. To help her celebrate, I gathered wishes from friends and family members and then scrapped them into a Birthday Blessing Book. I made an altered tin for the book to go in. Her initials are on the front cover.
The tin got a little bulgy with all the wishes in the book...so I had to tie the tin shut with ribbon!
I made special pockets for the book for the original emails from her friends. The pocket paper was from Martha Stewart and had a sort of vinyl feel to it, so it is stretchy and able to hold folded paper. I punched a notch in the top of the pocket. The papers that I used for the book are from Heidi Grace.
I wanted to make the book interactive, so I hid things here and there. Traci had a Bible verse for my sister which I hid under a taggy flap, securing it closed with a mini magnet.
This picture shows Traci's verse when the taggy flap is closed.
For Rebecca's wishes I used clear buttons that I glued matching papers on the back, then tied the buttons with frayed ribbon fibers.

On Rachel and Marsha's wishes I used super cute epoxy brads as little accents. I also made "ribbon" with paper strips.
When using ribbon on projects, make sure that you use super adhesive to help the ribbon stay put. I love Stampin' Up's sticky strip.
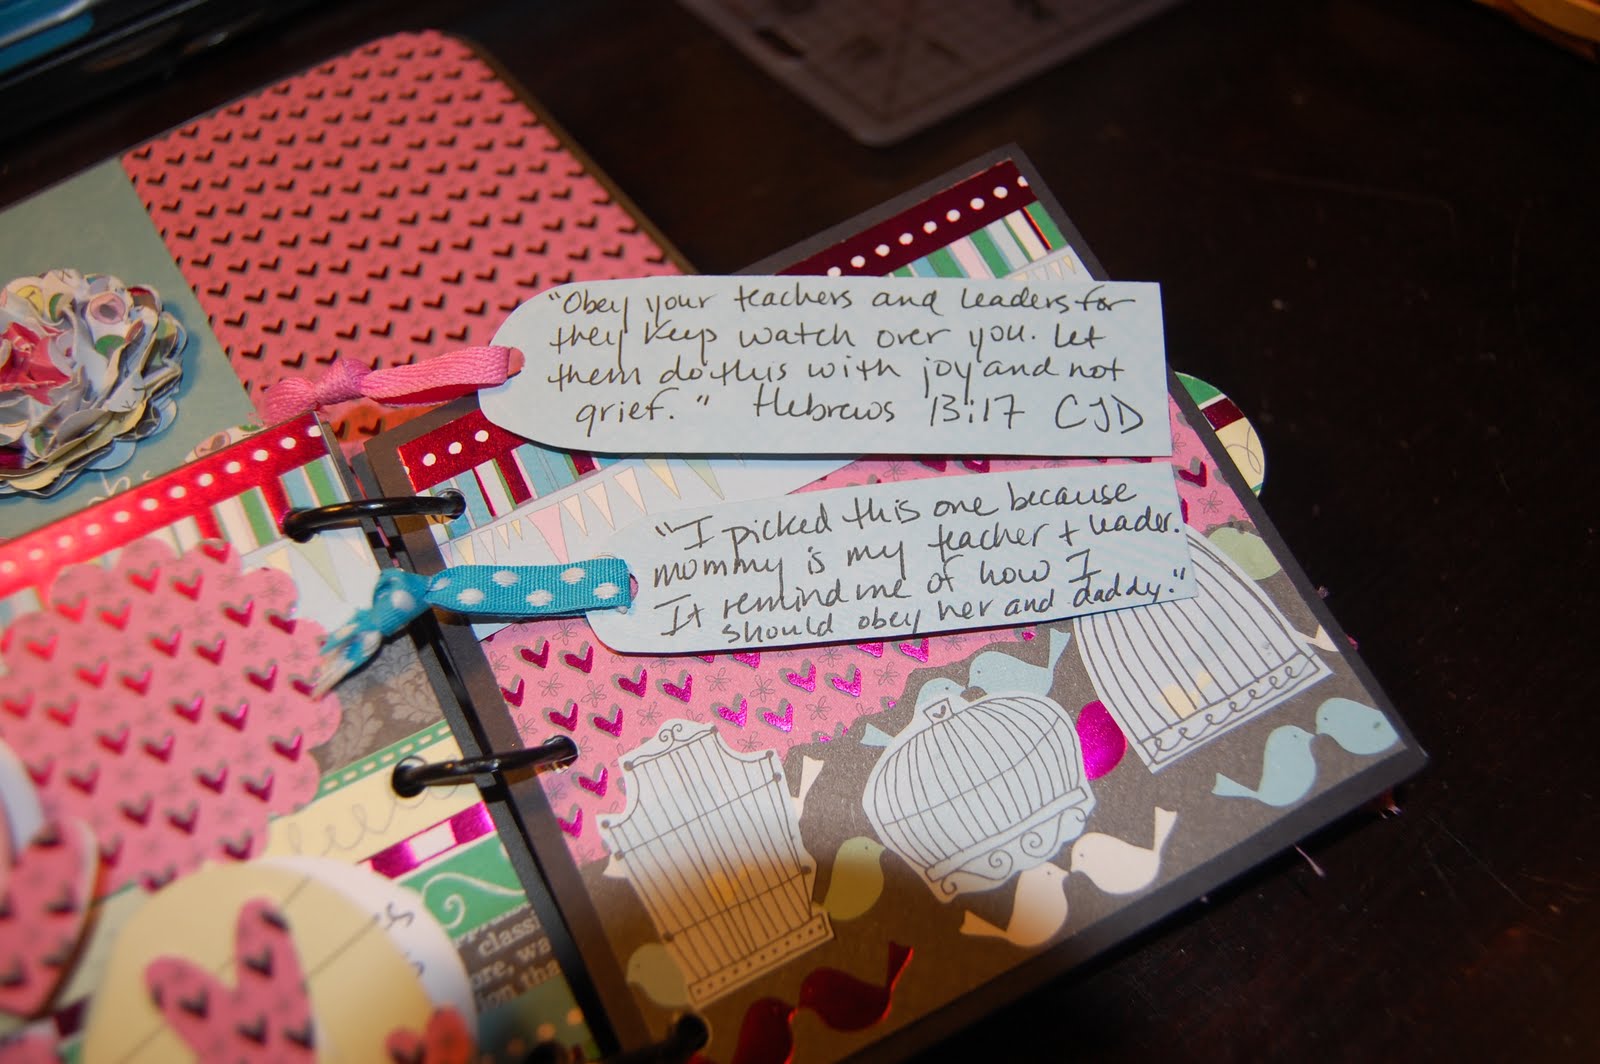
Carolyn and Abby's page both had interactive elements. For Carolyn's wishes I put them on tags that I made by using the birdcages as shapes for the tags. For Abby's, I folded paper and used a punch to create the circle flaps. Fold paper in 1/2 and then put it in your punch without punching through the folded bit and you'll create a sort of book. I made the tag on Traci's the same way.

For the greetings from Grace and Michelle I just kept it simple, adding a little texture with ribbon.
Here's another look at the email pockets. I only used adhesive on the bottom of the pockets because the inside edges were held closed by the black rings, while the outside edges were folded over in one continuous piece of paper--didn't need adhesive.
Janey's greeting was the last one that I put in the book which was getting really thick by now! Because I was worried about the tin being able to close, I didn't put any embellishments on Janey's page.
You can click on any of the pictures for an up close look. Happy Birthday sis!!

Thursday, November 18, 2010

Things in my backyard

This year Fall has been more colorful than I remember it being last year. It could be that I'm just used to the perpetual green around here now and I can see the fall colors in the midst of that and not be overwhelmed by the green. Whatever it is, I find it beautiful! This Japanese Maple is in our backyard not too far from the swimming pool.
I think I might be obsessed with mushrooms! The yard guys come on Tuesdays and mow through any mushrooms that have grown. So, if I want to take a picture I have to look sometime before they get here. These little red mushrooms keep coming back in about the same spot every week. I finally got down on my knees to take this picture. Shots from above just look silly, like there is a clown nose in the grass. When I pick the mushroom to take pictures that way, it feels like something gets lost in that process. I'm sure I'll keep trying.


Happy Fall!! Soon it will be Thanksgiving. May you be blessed with much to be thankful!


Saturday, October 23, 2010

Still MORE Jellies


These last jellies were pink, and not in the same tank as the orange jellies. Hope you've enjoyed my jellies!

Friday, October 22, 2010

Egg Yolk Jellies


These are the Egg Yolk Jellies I saw at the Monterey Bay Aquarium. Aren't they cute!? They remind me of my Egg Yolk poppies that I took pictures of this summer! Check out my posting on 7/14/2010 if you want to compare.

Happy Weekend! I'll post even more jellies tomorrow.

Thursday, October 21, 2010

Spotted Jellies


These pictures I took are of the Spotted Jellyfish from the Monterey Bay Aquarium. Aren't they amazing!? At the aquarium there is an entire room full of various Jelly Fish. Tomorrow I'll show you the Egg Yolk Jelly. Can you guess what it looks like? Jellyfish are zooplankton.

Jellyfish do not have brains. They are cnidarians, pronounced nih dhar' ee uhnz. Their name comes from the Greek word, "knide", which means nettle. The spotted jelly in my pictures are Phyllorihiza punctata and are commonly found around Australia in the summertime. Most people know that Jellyfish sting anything that comes in contact with their tentacles. Their stings can be deadly. The process for stinging is similar to a bee sting. The bee inserts the stinger which then leaves the bee's body, while the Jellyfish inserts a hollow thread that is attached to a cell within their body called a nematocyst. The thread is attached to a little arrow like sharp point which breaks the skin, then the thread delivers the poison to the victim. The threads are attached to the tentacles which then bring the now paralyzed victim to the mouth of the jelly for consuming. Humans are too big for a jellyfish to digest, so if stung by a jelly, you will not be eaten by one! However, the jelly's sting is full of poison and will cause swelling and irritation. Some people are allergic to this poison and may suffer more than others; still others have died from jellyfish stings. So, stay away from jellyfish!

While it is true that jellys do not have brains, they are far from simple. In reading just a few pages from my kids' science books, I am truly amazed! Once they use up their nematocysts, more grow in their place. Once a bee stings you, it dies. If a jellyfish stings you, it just regenerates the nematocysts. Their lifecycle is complicated. The way they reproduce is astounding. They are not able to process visual information, but they DO have eyes which can detect light from dark! This is very important for their survival because it allows them to tell up from down. Survival is toward the light, or the surface. They rise to the surface at night to avoid predators like the leatherback turtle. In the day they sink toward the bottom of the ocean. Some jellyfish can grow to be 400 pounds! Jellyfish eat fish. A group of jellyfish is called a smack.

I'll post the Egg Yolk Jelly tomorrow along with an orange jelly. My information on jellyfish comes from "Exploring Creation with Zoology 2" from Apologia Science.


Friday, October 15, 2010

What I've been up to...

I have been having such fun playing with the Stampin' Up Owl Punch! This card I made for our neighbor's birthday. The front of the card has the large woodgrain stamp from SU so that it looks like a tree the owls are peeking out of. I stuck a speech bubble on the front that says, "Whoo's birthday is it?" I focused my shot on the owls though, so you can't read the bubble!


I stamped the woodgrain stamp on a piece of brown card stock and cut it to be shaped like a tree so the owls would have somewhere to perch. Since the card was for a 12 year old's birthday, I used googly eyes on the owls.

The next creations were inspired by the coolest catering truck I saw on 680 South a few days ago. The truck was covered with a huge black and white graphic floral design, with a splotch of golden yellow. Made me go, "Oooo, I want to make a card with those colors!!" Here is what I came up with:
Then I made a little box using an old Altoid's Tin and a very HUGE button that I got from Nancy.
Last, but not least!! Me with my new haircut!


Thursday, October 14, 2010

Ah, the life of a dog!

Good news! My watch will be repaired. It won't be free...but it will be fixed, and cheaper than a super expensive, nice watch. ::sigh::

If I were a dog, I wouldn't worry about things like watches and what time of day it might be. I might be thinking about my next meal, but only if I'm not sitting calmly in a sunny spot soaking up God's good sunshine. I would be looking at the world from about a foot off the ground. I would be looking for my comfy spot in my little bed in the school room where my people seem to spend so much of their time. It would not bother me if my mailbox only had political ads in it. I wouldn't be concerned about what shoes match with my pants. I would understand that my people love me and care a lot about me. I'd be thankful everyday for the place God put me those many years in San Diego when I first came to them.

Tuesday, October 12, 2010

What time is it?

Oh, it's a sad day today. I've realized, after three battery replacements, that my very favorite watch is about to die. At least, I think it is. My watch is a Raymond Weil, "Tango". She is the best! I've worn her everyday for twelve years. My wonderful husband gave her to me when I turned 30 and retired from teaching. I had been joking that I wanted a Rolex watch for my retirement. I was young and nieve! We'd been married only five years then. I'm not sure how I thought my hubby could afford a Rolex! He is truly the best though, he researched Rolex and tried to find the beginner one for me, but just couldn't shell out the dough required. So, he went for the Raymond Weil instead. I love this watch and never thought twice about Rolex after David presented her to me at my retirement party! If you are shopping for a watch, check out Raymond Weil.

I'm not sure what I'll do without her. I'm hoping that I can take her to a good watch doctor for a check-up and a fix-up. I'm heaving heavy sighs for her right now.

Perhaps this rapid decline of my time keeping device can be blamed for my behindedness state on the blog? I have many pictures of cards made that I want to share with you, but time has gotten away from me...litterally!

Monday, September 20, 2010

Monday Already?

Monday, already?? The weekend flew by really. I had intended to post this weekend, but didn't get to it. Oh well.

We are back to school full swing now. All the kids' activities have started and we are all back to BSF for the study of Isaiah. This week we'll be talking about chapter 1 in our discussion groups. It should be pretty exciting. I'm teaching level 3 kids, 5th and 6th graders. It is pretty exciting to hear what they learn when they do their daily study questions. I will miss being with a group of ladies as I was last year as a group leader, but I'm enjoying the switch already.

Even though I didn't post this weekend, I did make a fun card that I have to share with you! See if you can recognize the little creatures in my card from previous cards where they appeared as different animals....

Tuesday, August 24, 2010

Treasures of the Earth also known as Mushrooms


It never ceases to amaze me the things that we find in our yard. I think it's all about having your eyes open and just being generally observant. Isn't this the strangest looking thing!? It's a mushroom! Lactarius is the variety of this Mushroom. I've never seen anything like this before. Surprisingly, to me, this mushroom has gills under the cap. This second picture makes me think of a character that Jim Henson might have come up with as a Muppet. Can't you see it? A sort of friendly, green monster with a wide mouth...or something like that. I came across this one yesterday morning.
I have never seen red mushrooms! Have you? I was pretty excited when we found these growing in our yard last night. They looked just like the mushrooms that I remember from stories like Hansel and Gretel or other woodsy-type fairytales. I found out that these are a variety of Russula. I had so much fun taking pictures of them last night. I actually took about 40 pictures! LOVE my camera.


These cuties were deep in the grass, I had to dig them out to be able to take any pictures of them that made sense. They sort of just looked like red new potatoes laying on my lawn! Thanks to Darvin, SOMA Science Advisor at the Sonoma County Mycological Association for helping me to identify these.
It was such fun to discover these mushrooms...it really was like finding little treasures of the earth!
What have you found in your yard!?


Monday, August 16, 2010

Bounty of Summer

Does it feel like Fall is around the corner? I know that my Midwest friends really want Fall to be that close, and my East Coast friends have been sweltering too. Thoughts are turning toward Fall for the cooler temperatures as well as for sending children back to school. Friday I did a little watercoloring. I loved how these birch trees turned out. I could almost hear the cool breezes rustling through the leaves. However, August though it may be, it does not seem like Fall is on its way any time soon.
So, I bring you some of Summer's Bounty in these beautiful Dahlias that my friend Mary brought me today.

Aren't they lovely!? Thanks Mary for brightening my day!


Thursday, August 12, 2010

Big Picture Scrapbooking Summer Idea Festival


This last picture is the full shot of the door knob cones, or Tussy Mussies that I made today for Day One of Big Picture Scrapbooking Summer Idea Festival. The design idea was from Elizabeth Dillow. The first shot shows a close up of the chunky pink glitter that I used, the second shot shows the huge flower embellishment that I did. I used an antique button for the center of the flower and about 15 layers of paper for the flower! For the next two weeks I'll be "in class" at Big Picture with a different assignment every day. I can't wait for each day's assignment! Come back often and check my progress.


Sunday, July 25, 2010

Details on "Read" banner and some cool paper flowers

This post starts with a look at some re-purposed book pages and a disclaimer. The public library in my town has a little cart in an undisclosed location that has books on it with a little sign, "FREE to a good home". I discovered the cart one day when I had wandered down the hall by the library's used book store. On the cart that day I saw some old textbooks, a few Nat. Geo. mags, some outdated travel books, and the discovery of the day....really aged, out of print books with wonderfully yellowed pages that were crying out for a useful purpose. I took one of the books off the cart and flipped it open. As I ran my fingers across the pages, I about gasped. Suddenly lots of crafty ideas were creeping into my brain. I snapped the book shut and looked behind me. No one was around. I held the book in my lap and looked on the shelf for more. I only found one that day that was truly useful. Now, I have to say that I'm not really sure that I was taking the book home to a "good" home since I fully intended to cut the thing up once I got it home. However, in the spirit of all things "green" and re-purposed, I KNOW that I've done a "good thing". At least, I think Martha Stewart would agree with me.

So, on to the banner and cool paper flowers. Here is a look at the pages of the book that I started with. Just use your craft knife as close to the binding as you can go and begin cutting out the pages. If you need to have a moment of silence before you cut, go ahead and do so. Once I had cut my pages out, I placed them on the Sizzix Pennant die and ran it through my Big Shot machine. You can see in the picture below that the die cuts two sizes of pennants as well as scalloped circles. I used the smaller size pennant for the book page element on my "read" banner. For the larger pennant, I used a lunch bag. I crumpled up the lunch bag, smoothed it out, folded it in half and then ran it through the machine. After I did that I wanted to add more texture, so I ran the paper bag pennants through the machine again with the texture plates. It was difficult to get photo detail on that, so you'll just have to take my word for it. I have not tried heavy duty grocery bags yet. The lunch bags are smaller and of lighter weight paper and work nicely. If you try it with paper grocery bags, let me know how it works for you.
I used eight scallop circles of book pages to make the paper flower embellishments. Take the eight circles, line them up and then poke a hole through the middle of all of them. You can use a piercing mat and poke the hole through all eight at once if you like. Put a brad of some kind through the hole of all eight. I used a mini brad, but I think you could use any kind of brad you like; one with some bling would be really nice.
Now you will begin to make the flower. Take the top layer of book page and crumple it up as you can see in the picture. Proceed to do that with all the layers until you get to the last one.
Crumple the last layer too. Some people like to crumple the paper first and then punch the hole in the middle. I tried that and didn't like those results as much as I did when I punched first and then crumpled. I think it was just easier to manage the papers when they were already joined together. A side note about papers: these flowers are lovely to make with the old book pages because the paper is somewhat thin, and really flexible making it easy to crumple. If you want to make these flowers with card stock, you can use the same steps. However, (and this is important) before you crumple the paper you might want to mist it with some water first. If you have some misty stuff that has sparkle in it, use that. If you just have water, that works well too. The water will help the paper crumple more easily. Or, if you know how to do faux suede, do that first and then crumple. At any rate once you have crumpled all the layers, your flower should look like this:


Now comes the fun part. Begin to uncrumple the flower bit by bit until you come up with something like this:
On my final banner I took a glue pen and dabbed it around the edges of the flower and then smooshed it in some glitter....looked really pretty! Once you get the hang of the steps on these flowers you can let your creative juices flow and come up with really pretty things. You can ink the edges of the scallop circles before you crumple to give some depth to your flower. If you ink the same shade of ink in darker intensity on each layer you'll end up with a sort of ombre flower. All kinds of possibilities for these beauties! Just let your mind wander and see what you come up with. Remember my favorite crafty mantra: "There are no mistakes, only creative opportunities!"

A second variation on this flower is shown in the picture below. There you'll see a flower that I made with just the lunch bags, it's on the top right hand side of the picture. Next to it on the left is a really big flower. I made that one with the book pages as the center of the flower, and then I added some crumpled strips of paper bag on the outside of the flower. I've got the instructions for that bit just a bit further down in this post. The third flower is one that I made with a scallop circle base, and then a torn strip of book page. That one is made just like the paper bag strip flower that I'll show you next. The picture of it turned out a little bit flat. However, if you are going to make these flowers for a card that you want to send in the mail, you might want to go with that option or you'll be paying extra postage.


Now the instructions for the simple paper bag strip flower. Begin with a circle of card stock in any size. The size that you begin with will determine the size of your final flower. A smaller circle will yield a smaller flower. The big flower above used a 2 inch circle to begin with. My example below is a 1 3/8 inch circle. Oh, and by the way, you can do this with other shapes too, squares, rectangles, whatever you want.
Once you have determined the size of your circle, all around the outer edge of the circle put adhesive. I used tape type adhesive, but you could use liquid glue, or whatever you have on hand.
To make the strip of lunch bag, I cut open a lunch bag, cut the bottom off and then crumpled and crumpled. It's a great way to relieve stress! :) After I did that I smoothed the bag out enough to use my paper cutter on it to cut strips because I really can't cut straight at all. I cut strips of about 1/2 inch.
Begin to stick the strip of paper to the adhesive on the circle, working it all around the edges.

When you reach the place where you began the strip of paper, just rip off the excess paper from the strip. You may want to flip the circle over to the other side to see what it looks like before you rip the strip off.


Now just flatten the circle out a bit and you've got the base of the flatter strip flower. You will add layers on to this with more lunch bag strips. You can either apply more glue to the center of the circle and add the strip there, or punch out another smaller circle and do the same thing over again and then attach that to the center of the first flat strip flower you made. It is kind of addicting to make these. They are lovely in tissue paper too!

Now we've got the embellishments for the banner, so back to the banner itself. As I mentioned, I cut the pennants out of book pages and lunch bags. Here they are:
I assembled them with the paper bag on the bottom, book page on the top, glitter on the edges of both. I stamped the letters "r","e","a" and "d" on scallop circles in a neutral color ink. Then I took a white gel pen and highlighted the letters a bit. I attached the letter scallop circles each onto a strip flower and then put those on the banner.
The rosettes in between each letter are the paper flowers that I showed you at the beginning of this now very long post. To attach them to the top of the banner I used mini clothes pins which I put a stripe of sticky strip, also known as "red line tape", on the clothespin and then pressed the flower onto the adhesive. These clips will be removable from the banner so that when I'm done with the banner I can use the clips as a pretty pin on a gift bag or even on the lapel of a blouse.
If you didn't see the post from yesterday go check it out because it has a nice picture of the banner en situ.
I have a feeling that I've only just begun to play with these flowers. I'd love to see what you come up with! Have a happy day!